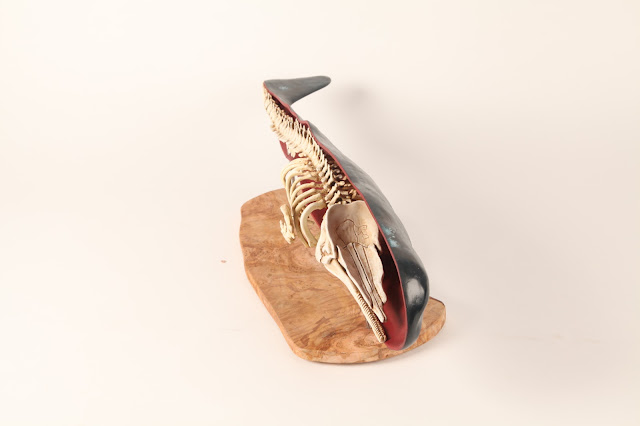
The Project first started with a 2 week clay sculpt of the skin half of the whale. this was based on various images provided by Google images and stills from Youtube video's, I included some of the more interesting textures, like the jaw scrapes from other Sperm Whales and suction cup scars from their main prey, squid.
This sculpt was molded with silicone and a fiberglass jacket, this skin half was cast out in fiberglass, cleaned up and put to one side whilst i began the process of making the skeleton.
The vast majority of the skeleton was made by the process of; chavant sculpts, silicone block molds(Tinsil/Supersil 25 QC), fast-cast casts (easyflow 120).
The Spine was made using 7 master sculpts, these were cast cast out multiple time (e.g. sculpt 1- cast out 2 times, sculpt 2 - cast out 4 times) these were then seamed, any bubbles were filled (P38), holes were drilled in the center and the were then treaded on a 9mm steel rod pre-bent to the curvature of the spine of a sperm whale depicted in various models (including the one in the National History Museum; Whale room).
A mount was made for the spine and skull; first a hole hole was drilled in the skull for the spine to 'plug' into, the these were released using Vaseline and pushed into piles of catalyzed car body filler on the fiberglass skin half and left for the filler to go off. For added strength to support the weight of the skull a hole was drilled through the cast and into the filler in which a 4mm steel rod was inserted, the top of the hole was filled.
The ribs were cut roughly on a band saw, whittled with a craft knife and sanded smooth, these originals were made of purple chemi-wood (polyurethane model board). These were then molded and cast out twice, for each side of the rub cage. A similar process was carried for the small bones between ribs that connect to the skull, except the not molded the chemi-wood originals were used.
The flipper bones were sculpted, molded and cast out, once this was done all skeleton bones were ready. They were gently assembled together using piano wire inserts and glue. whilst waiting on the various stages of the molding/casting process of the bones, I had been altering the skin fiberglass half's interior; filling and sanding away the fiberglass texture and adding a 5mm thickness to the edge to give the model a sturdier look. During this time i also bought a cheese board to mount the model upon (I could've made a base, but I had concerns about an ever approaching deadline).
The skeleton and skin half were painted separately using acrylics brushes and sponges. The skeleton took 3/4 days to paint, the skin half took about 5 days (it took me a while to figure out how to paint the white fungie, scar tissues and getting the border of red meeting blue just right) They were assembled together afterwards using various prepared rods, locators and a paranoid amount of glue. When i had finished painting the outer side of the skin half i noticed that the colours used made it a dust magnet, so i used an airbrush to apply a gloss lacquer, in order to make it easier to dust (in my opinion i should have used a matt lacquer).
I could not have made this model without the extremly informative book "The Sperm Whale Engineering Manual" by Lee Post
Which can be found here: http://www.theboneman.com/spermwhaleskeletons.html


No comments:
Post a Comment