Saturday, 16 November 2013
WIP Ash tray
Just a few pictures of a project that I need to finish painting...
I sculpted out super sculpy soft pack out with firm grade, (I did this simply to make the soft grade go further and the firm stuff is pretty horrible to sculpt with on its own). The shape is built around half an Ali drinks can, this was to act as an partially expose armature and to have something metallic to stub things on.
I spent about 5 hours-ish of relaxed sculpting whilst sat in front of the TV over a couple of days. I didn't want to risk singeing this in the oven, so i put it in boiling water (I swapped out the water about 5 times ensuring that it should have been heated enough) . Unfortunately because of the Ali can, when the sculpy shank as it set, a few cracks formed along some of the thinner sections of the sculpt.
This has been painted with acrylics, and a small amount of Chameleon Nano Flakes an iridescent pigment that come in powdered form.
I'm pretty sure that the squid is going to be a bit more orange and dry brushed with Goldfinger (like the phone case's watch parts).
A New phone Case
I've been gently working away at this for about a month now.
First i bought a cheap ultra thin phone case, I did a sculpt onto the outer surface in chavant; I didn't want to have to bother figuring out how to get a good clean grip to the phone so i let someone else to that hard work for me. The sculpt also included some watch parts, i used a blow torch to melt the surface of the teeth to get a nice smooth glossy finish.
This was then moulded in silicone; it's a 2 part mould, the syringe is for a fill hole, tooth picks are for risers (holes for air to escape), the steel rods are to strengthen the top part of the mould. In a previous mould for an ipad case the silicone would droop and collapse causing the cast shaped to be warped and unusable, the steel rods seemed to have worked (they can also be removed and re-inserted if i need to flex this part of he mould)
The teeth were dusted with copper filler power in the mould, and then a thin layer of cold casted fast cast, ratio of filler powder was at 3:1. The cast was: seamed, sanded, filled, sanded again, primed and painted (acylic) I used a small amount of Chamelon Nano Flakes in the outside frame to give is a strange light splitting sheen. To get the teeth to shine (the picture doesn't do it justice) i used a combination of Silvo, and brass/copper polish and buffed the hell out of it.
First i bought a cheap ultra thin phone case, I did a sculpt onto the outer surface in chavant; I didn't want to have to bother figuring out how to get a good clean grip to the phone so i let someone else to that hard work for me. The sculpt also included some watch parts, i used a blow torch to melt the surface of the teeth to get a nice smooth glossy finish.
Copper and Brass work
A New Gramophone
I made this to retrain myself how to work with relatively soft metals (Copper and Brass) and how to rivet, silver solder and acid etch again along with basic metal forming. I also used the techniques involved as a reference whilst i was training a friend to become a jeweler. The gramophone itself will go to my grandma as a gift. You know I've just realized that this doesn't have a stylus... Bugger.
The Horn was made 4 strips of copper: annealed, bent round, and silver soldered together.
These then had 6 hole drilled in (2 on top, 4 on the bottom) and 3 strips were riveted on, binding the rings together.
The record is brass that has been acid etched, the lines are consecutive as opposed to a spiral which i had no idea how to draw out accurately by hand.
To give a sense of scale the base is 40 x 40mm wide, and the mouth of the horn is 105mm wide.
Tuesday, 1 October 2013
Artizan Medical Work
I did these a few months back along with Chloe Gray: http://www.chloelgray.co.uk/
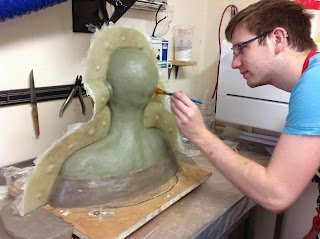
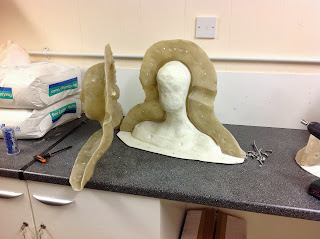
They are pretty straight forward fiberglass molds I made for cadaver models.
These were 5 part moulds, 2 outer halfs an inner core along with inserts for the ears.
This is the walling i made for the first fiberglass half to be built onto.
The first mold was taken from a chavant slush life cast, whilst the other 2 were sculpts by Chloe Gray
The inserts were made a pigmanted rencast, the sculpts were angled and supported; the plastic was pored in and left to set. the locators were carefully drilled after.
Oh look! there's me applying polywax release agent...
Once the outer mold was finished: the bolt holes were drilled, the flang was trimmed and sanded, the mold opened up, cleaned and lined with clay, and fiberglassed onto; the majority of this was done in to halfs and fiberglassed together so that two poeple could work on a single core at a time speeding up the process.
The whole process took two weeks.
They are pretty straight forward fiberglass molds I made for cadaver models.
This is the walling i made for the first fiberglass half to be built onto.
The first mold was taken from a chavant slush life cast, whilst the other 2 were sculpts by Chloe Gray
The inserts were made a pigmanted rencast, the sculpts were angled and supported; the plastic was pored in and left to set. the locators were carefully drilled after.
Oh look! there's me applying polywax release agent...
Once the outer mold was finished: the bolt holes were drilled, the flang was trimmed and sanded, the mold opened up, cleaned and lined with clay, and fiberglassed onto; the majority of this was done in to halfs and fiberglassed together so that two poeple could work on a single core at a time speeding up the process.
The whole process took two weeks.
Saturday, 15 June 2013
Sperm Whale Anatmoical Model At 1:25 Scale
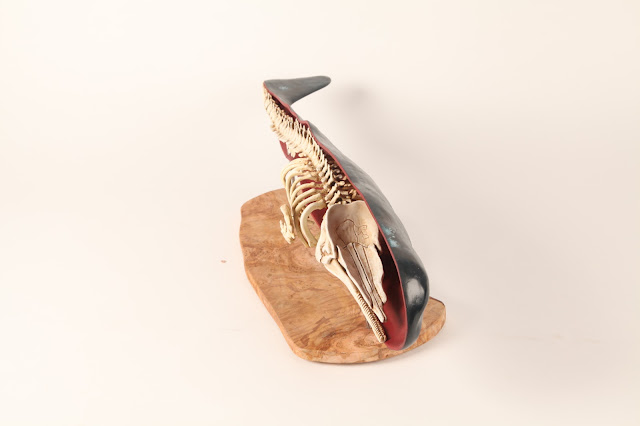
My University of Hertfordshire final project, a anatomical Sperm Whale Model at 1:25th scale. This represents roughly 14 weeks of work (I was doing a few other projects at the same time including a dissertation), the idea was inspired by the Inside Natures Giants series on Channel 4. The model it's self measures roughly 850mm length 350mm width and 450mm height.
The Project first started with a 2 week clay sculpt of the skin half of the whale. this was based on various images provided by Google images and stills from Youtube video's, I included some of the more interesting textures, like the jaw scrapes from other Sperm Whales and suction cup scars from their main prey, squid.
This sculpt was molded with silicone and a fiberglass jacket, this skin half was cast out in fiberglass, cleaned up and put to one side whilst i began the process of making the skeleton.
The vast majority of the skeleton was made by the process of; chavant sculpts, silicone block molds(Tinsil/Supersil 25 QC), fast-cast casts (easyflow 120).
The Spine was made using 7 master sculpts, these were cast cast out multiple time (e.g. sculpt 1- cast out 2 times, sculpt 2 - cast out 4 times) these were then seamed, any bubbles were filled (P38), holes were drilled in the center and the were then treaded on a 9mm steel rod pre-bent to the curvature of the spine of a sperm whale depicted in various models (including the one in the National History Museum; Whale room).
A mount was made for the spine and skull; first a hole hole was drilled in the skull for the spine to 'plug' into, the these were released using Vaseline and pushed into piles of catalyzed car body filler on the fiberglass skin half and left for the filler to go off. For added strength to support the weight of the skull a hole was drilled through the cast and into the filler in which a 4mm steel rod was inserted, the top of the hole was filled.
The ribs were cut roughly on a band saw, whittled with a craft knife and sanded smooth, these originals were made of purple chemi-wood (polyurethane model board). These were then molded and cast out twice, for each side of the rub cage. A similar process was carried for the small bones between ribs that connect to the skull, except the not molded the chemi-wood originals were used.
The flipper bones were sculpted, molded and cast out, once this was done all skeleton bones were ready. They were gently assembled together using piano wire inserts and glue. whilst waiting on the various stages of the molding/casting process of the bones, I had been altering the skin fiberglass half's interior; filling and sanding away the fiberglass texture and adding a 5mm thickness to the edge to give the model a sturdier look. During this time i also bought a cheese board to mount the model upon (I could've made a base, but I had concerns about an ever approaching deadline).
The skeleton and skin half were painted separately using acrylics brushes and sponges. The skeleton took 3/4 days to paint, the skin half took about 5 days (it took me a while to figure out how to paint the white fungie, scar tissues and getting the border of red meeting blue just right) They were assembled together afterwards using various prepared rods, locators and a paranoid amount of glue. When i had finished painting the outer side of the skin half i noticed that the colours used made it a dust magnet, so i used an airbrush to apply a gloss lacquer, in order to make it easier to dust (in my opinion i should have used a matt lacquer).
I could not have made this model without the extremly informative book "The Sperm Whale Engineering Manual" by Lee Post
Which can be found here: http://www.theboneman.com/spermwhaleskeletons.html
Subscribe to:
Comments (Atom)


